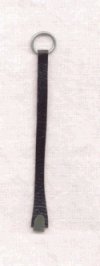
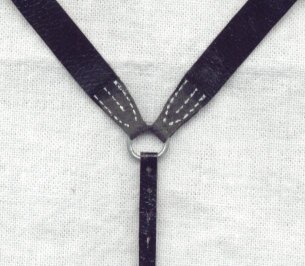
 First thing
I did was the back part of the Y-belt. I made a circle from some steel wire , got myself a
can of beer out of the refridgerator and drunk it (that was the hardest part :o) ) and
used the can to make the hook on the bottom.
First thing
I did was the back part of the Y-belt. I made a circle from some steel wire , got myself a
can of beer out of the refridgerator and drunk it (that was the hardest part :o) ) and
used the can to make the hook on the bottom.The Y-Belt
While I was busy making this homepage, the thought occured to me that there is much more that can be done. (Ofcourse there is always more........) And I must say that some of the reactions I became from the Sandboxers inspired me of improving the equipment of this Soldier. (btw. Thanks very much everyone)
That's when it became obvious that the next thing I wanted to do was improving the Y-belt because the one from Cotswold is sufficient, but not as detailed as the real thing.
So I got my tools , and started working. Every time I finished something, I just threw it under the scanner to make a picture of it , so I could show every step to you....
First thing
I did was the back part of the Y-belt. I made a circle from some steel wire , got myself a
can of beer out of the refridgerator and drunk it (that was the hardest part :o) ) and
used the can to make the hook on the bottom.
The "leather" is from a multo-map (ring binder) which had a nice leather like look.
As I was working on this and made the other leather belts the beer must have gotten into my head, because now I wanted the buckles to be working..... Ok , call me an idiot, but I just had to do it. First of all I had to find some material, and found a few led's (you know... Light Emitting Diodes) and the metal was suitable to make the buckles.
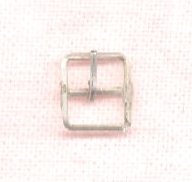 Here a shot
of the buckle...... and it was a hell of a job making them.... believe me.......
Here a shot
of the buckle...... and it was a hell of a job making them.... believe me.......
I tried to glue the middle piece , but the superglue didn't hold (only on my fingers ofcourse), so I welded them. A very difficult job.
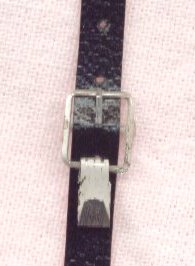
Here a shot of the front piece of the belt and the buckle and YES !, it is adjustable.

 Now ofcourse
the little hooks are attached as well.. they serve to clip the Y-belt onto the Belt of the
soldier (or the Magazin pouches)
Now ofcourse
the little hooks are attached as well.. they serve to clip the Y-belt onto the Belt of the
soldier (or the Magazin pouches)
They are made from the beer can as well.
After the two belts we completed, it was time to put everything together
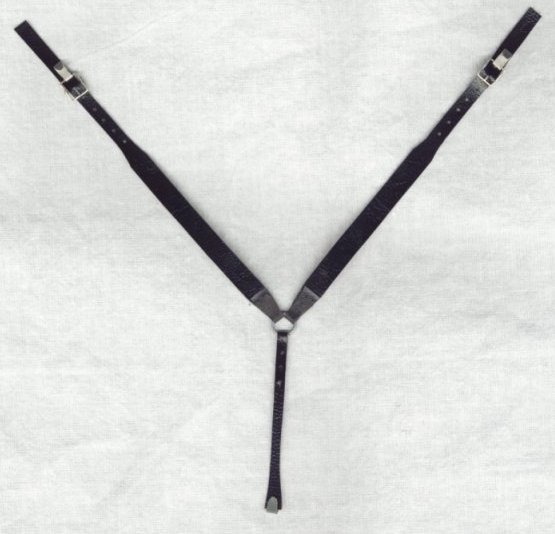
Now it is beginning to look like something !
 Ofcourse a
little painting makes the whole thing even look better.
Ofcourse a
little painting makes the whole thing even look better.
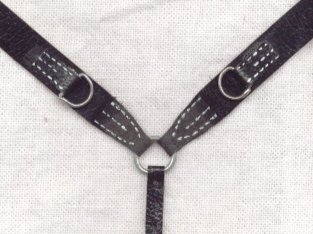
The next thing I did was make the little D-rings and attach them to the Y-belt.
 Ofcourse I
painted the stitches as well and it is really beginning to look nice now.
Ofcourse I
painted the stitches as well and it is really beginning to look nice now.
Well, it isn't finished yet , but I had to see how it looked on the soldier.
To see the result, skip to the NEXT PAGE